Grib og hold
Hand and Arm Grips
This hold is commonly used for moves such as:
- Cup-grip handspring (Inverted)
- Shoulder mount
- Iguana (Inverted)
About the hold:
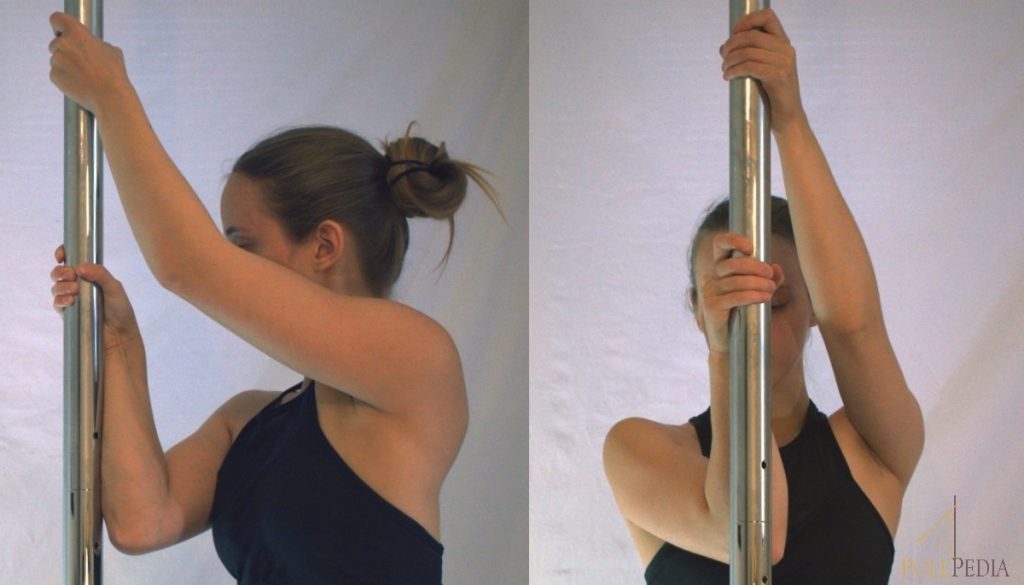
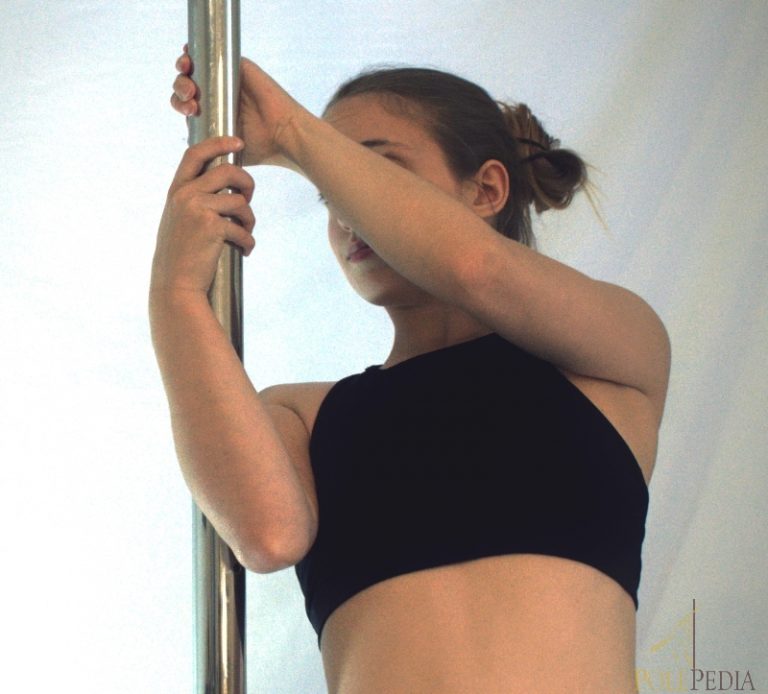
This grip requires finger strength to feel secure. Some moves may require a double-cup grip, such as the shoulder mount. In case of a double cup grip, your dominant hand should always go on top. For example, if you’re using your right side, your right hand should be on top.
All fingers should be on the same side of the pole in this grip, while the hands themselves can be on the same or opposite side. Most of your weight should be against the base of your fingers and the top of your palm. Many people feel this grip lacks security when used with spins.
How to get into it:
For a right-handed hold, use your right hand.
For a left-handed hold, use your left hand.
- Wrap your fingers firmly around the pole.
- Keep the thumb on the same side as the rest of your fingers.
This hold is commonly used for moves such as:
- Two-handed Meathook (Inverted)
- Cradle Spin
About the hold:
This is the most basic hold you’ll learn in pole dancing, and it’s used in a wide variety of moves. Most commonly, it can be seen in upright spins such as Fireman and Cradle.
Imagine you’re on a baseball field holding a baseball bat – now, bear with me, even if you’ve never played – that’s how you want to hold the pole! Thumbs wrapped around and hands on either side of the pole. This is called a Crush Grip and we’ll refer to it as such from here on out.
How to get into it:
For a right-handed hold, your right hand will be on top.
For a left-handed hold, your left hand will be on top.
- Take your top hand and place it on the pole, facing outward.
- Your fingers should wrap around one side, and your thumb should wrap around the opposite side in a Crush grip.
- Take your bottom hand and place it on the pole, facing in towards your top hand.
- Again, fingers to one side and thumb wrapped around the other in a Crush grip.
This hold is commonly used for moves such as:
- Chopper / Basic Invert (Inverted)
- Backhook spin (static)
- Pole Abs (Conditioning)
About the hold:
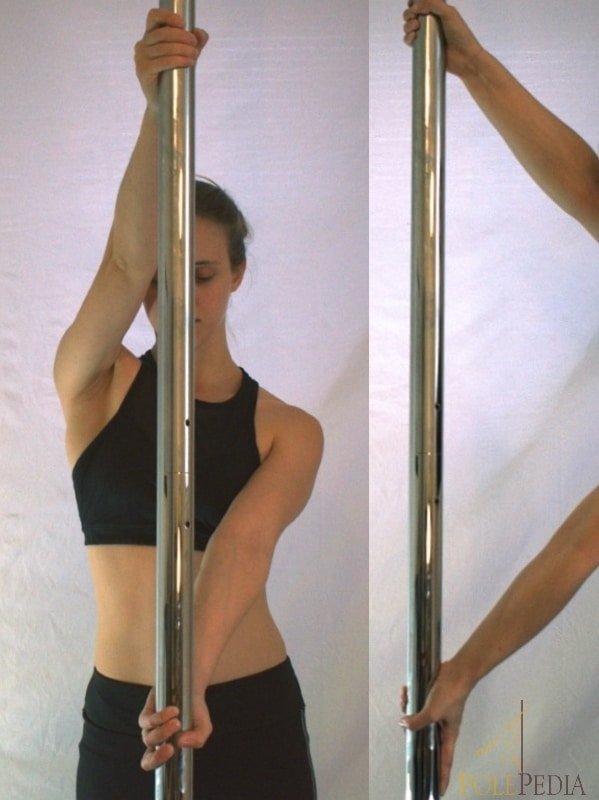
This hold is the basic stance you’ll want to be in when doing your pole abs, basic invert, or the static pole version of backhook spin. It relies on three main points of contact: the first is your typical baseball hand grip on top with the outside hand, the second will be your inside hand gripping the pole below the first, and third, you’ll be squeezing the pole against your inner arm. Imagine wrapping your arms around the pole and giving it a big ol’ side hug; that’s your stronghold grip!
How to get into it:
For a right-handed hold, your right hand will be on top
For a left-handed hold, your left hand will be on top
- Get your hips slightly in front of the pole so you can comfortably lean back, past the pole, and keep it resting on your hip.
- Take your bottom arm and squeeze the pole between your bicep and your chest.
- Bend your bottom arm at a 90-degree angle and hold the pole in a crush grip.
- Your bottom hand should come to about nose-level.
- Take your top hand, reach across your chest and grab the pole in a crush grip
- Your top hand should come to about eye-level.
This hold is commonly used for moves such as:
- Basic climb
- Caterpillar (Inverted)
About the hold:
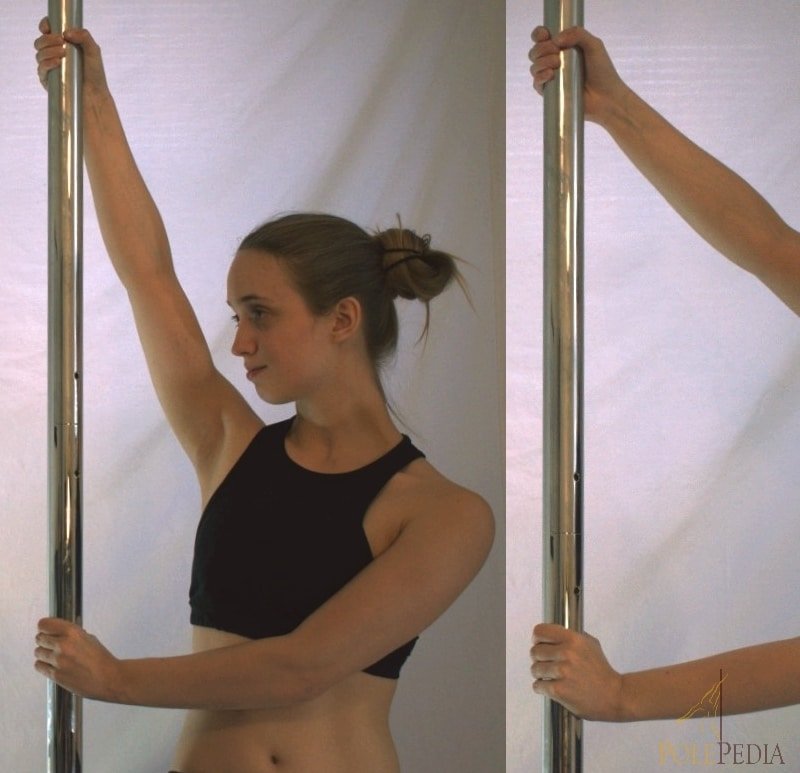
This grip will help anchor your body against the pole without powering through and trying to out-muscle the pole. You can think of this grip as a fulcrum for your body to move up and down. You should be able to completely release your legs in this hold without your body collapsing in.
How to get into it:
For a right-handed hold, your right arm is bent on bottom.
For a left-handed hold, your left arm is bent on bottom.
- Grab the pole about eye-level in a crush grip with your dominant hand, slightly on the side of the pole.
- Bend your arm towards the pole so your forearm lines up against it and your elbow is on the opposite side as your hand.
- With your opposite hand, reach up high above your head and grab the pole in a crush grip.
This hold is commonly used for moves such as:
- Split-grip Ayesha (Inverted)
- Split-grip Handspring (Inverted)
- Butterfly / Extended Butterfly
- Showgirl spin
- Cradle spin
About the hold:
This hold is common in a variety of spins and inverted moves, relying on the Push and Pull technique; you’re Pushing with your bottom hand and Pulling with your top hand at all times, engaging the shoulders and keeping your core tight. If you are inverted, the same principle applies, except your bottom hand is now closest to the ceiling, and your top to the floor.
One important note to remember about this hold is, you always want to keep your bottom finger (the “trigger finger”) pointed to align your wrist with the pole and help prevent injuries. See important information on the Push Pull Method here.
How to get into it:
For a right-handed hold, your right hand is on top.
For a left-handed hold, your left hand is on top.
- Reach up high above your head with your dominant hand and grab the pole in a crush grip.
- Reach low with your opposite hand and wrap your hand around it, index finger pointing down to the floor.
- Use the push-pull method as described above.
This hold is commonly used for moves such as:
- Chair spin
- Half-bracket attitude spin
- Fireman spin
About the hold:
This grip is a variant of the full split grip / bracket grip mentioned above. It still relies on the Push and Pull method, and it’s still important to engage the shoulders and keep the core tight. The main difference here is the bottom hand is held out like you’re about to shake someone’s hand. This reduces the strain on the bottom elbow if done properly, with much of the same utility as split grip. It is more commonly seen in upright moves, especially spins.
How to get into it:
For a right-handed hold, your right hand is on top.
For a left-handed hold, your left hand is on top.
- Reach up high above your head with your dominant hand and grab the pole in a crush grip.
- Bending your opposite arm to a 90-degree angle, grab the pole in a crush grip.
- Use the push-pull method.
This hold is commonly used for moves such as:
- Elbow Ayesha (Inverted)
- Elbow Jade (Inverted)
- Elbow Showgirl spin
About the hold:
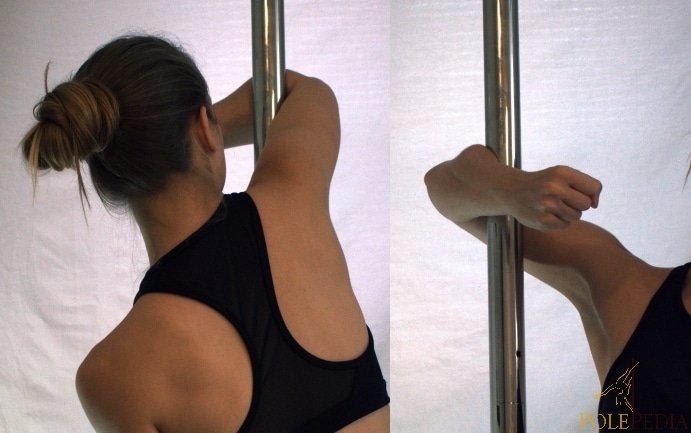
In this grip, the meaty inside part of the elbow wraps around the pole, locking your weight in against the pole. This is typically demonstrated in inverted moves such as Ayesha and Jade, or as a variation to split / bracket grip. This can also be a variant for upright moves that require a secure grip.
How to get into it:
For a right-handed hold, use your right arm.
For a left-handed hold, use your left arm.
- With your dominant arm, reach around the pole and place it in the crook of your elbow.
- Squeeze the pole tight inside your elbow.
This hold is commonly used for moves such as:
- Brass Monkey (Inverted)
- Forearm grip D (Inverted)
- Forearm grip Ayesha (Inverted)
- Passe Flag
About the hold:
This move is crucial in many inverted moves, from layback flips to brass monkey and forearm grip Ayesha and beyond. Most commonly found in inverted moves, it can provide a fulcrum to your body just like anchor grip can in a climb. Some moves may work well with a double forearm grip as well.
How to get into it:
For a right-handed hold, your right arm will be bent on bottom.
For a left-handed hold, your left arm will be bent on bottom.
- Keeping your dominant hand bent, wedge the pole into your armpit, grabbing the pole in a crush grip.
- Reach down with your opposite hand and wrap it around the pole, index finger pointing down to the floor.
This hold is commonly used for moves such as:
- Yogini
- Teddy
- Chopstick split
About the hold:
The armpit hold is not a favorite for many, pinching sensitive areas of the skin, but it can result in some gorgeous shapes such as Teddy which utilizes the front of the armpit, or the Chopstick split which utilizes the back of the armpit. Moves such as Gemini may incorporate the armpit hold but don’t rely on it quite like Yogini would. Overall, once you get comfortable with the armpit hold, it can become one of your best friends in pole dancing, especially as you move into more advanced tricks.
How to get into it:
For a right-handed hold, use your right arm.
For a left-handed hold, use your left arm.
- Wedge the pole into your armpit and squeeze it between your arm and your chest.
- Depending on the move, the pole may be to the back of your armpit or to the front.
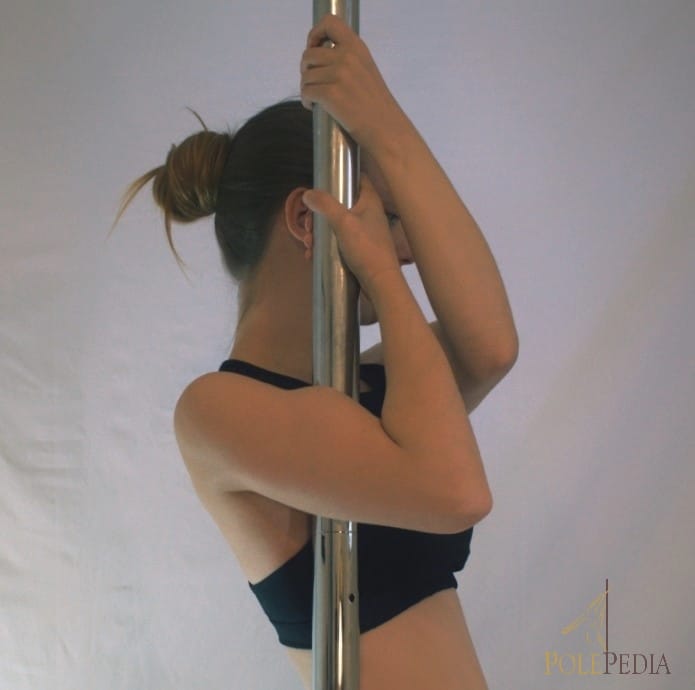
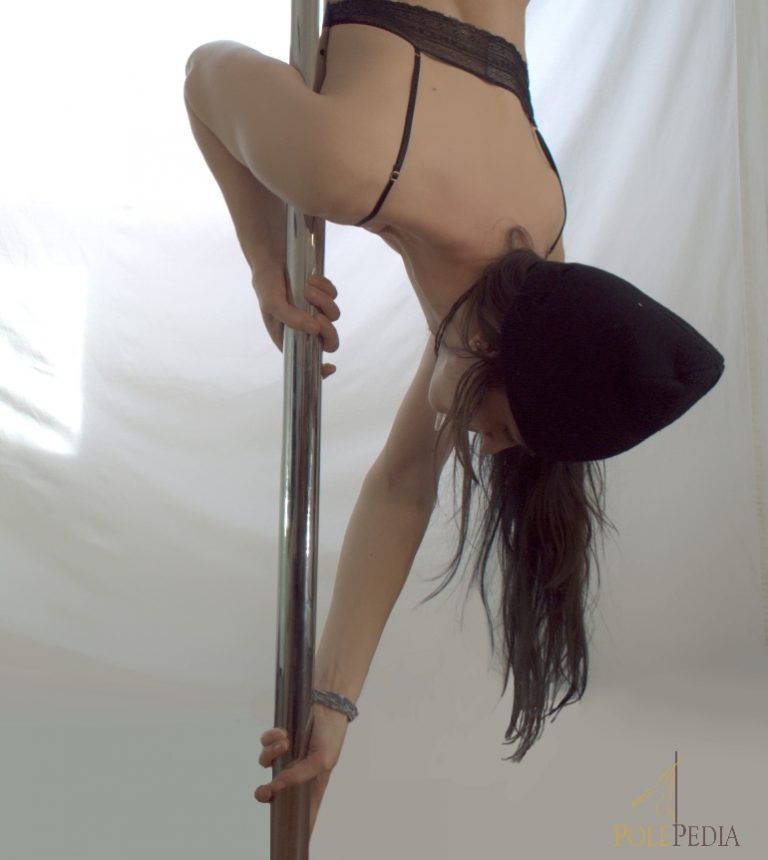
This hold is commonly used for moves such as:
- Princess grip shouldermount
- Sexy squat
About the hold:
The princess grip is a variation to the double cup grip commonly used in shoulder mounts. If the double cup grip puts a strain on your elbows or you’re not entirely comfortable with it, give this one a try! Some people like it, some people don’t. It’s all about preference here.
Another move this hand grip is commonly used in is the sexy squat; by holding the pole above you with both hands, you have much more control when you lower yourself down into the wide, straddle-squat position we all know and love
How to get into it:
For a right-handed hold, your right arm is on top.
For a left-handed hold, your left arm is on top.
- Rest the pole on your dominant side, against the meaty part of your shoulder (the Trapezius.)
- Your head should be to the opposite side of the pole so it can move freely.
Reach up high above your head with your dominant hand and grab the pole in a twisted grip.
-
- Your hand should go to the opposite side of the pole.
- Reach up with your opposite hand, bent at the elbow, and grab the pole right above your head.
- Your arm should be to the inside of your head to create a “window”, allowing your head to continue moving freely.
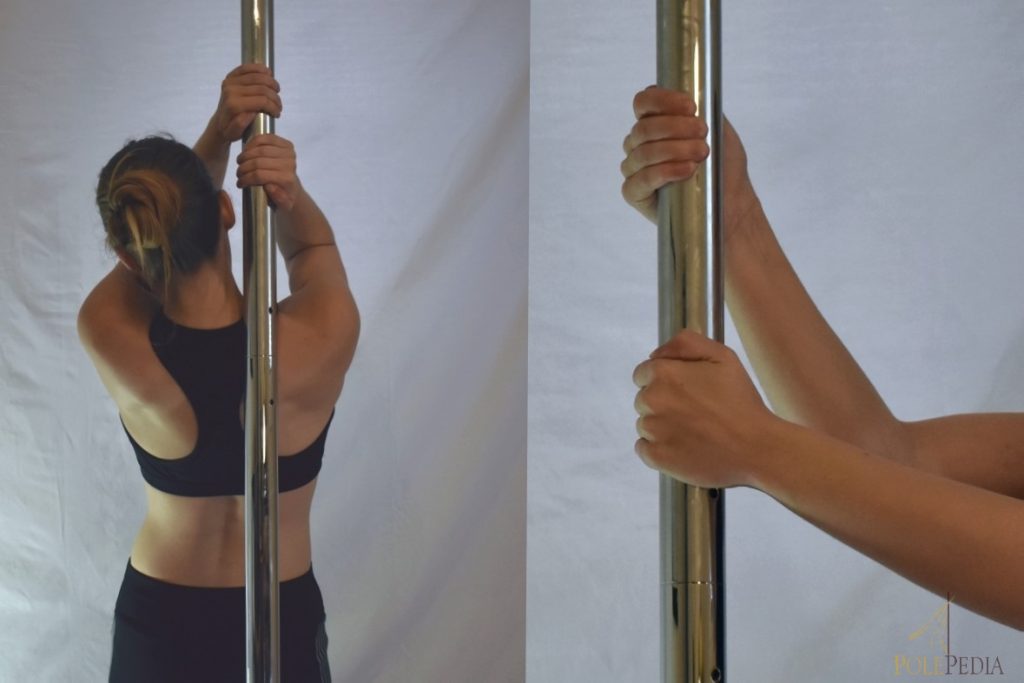
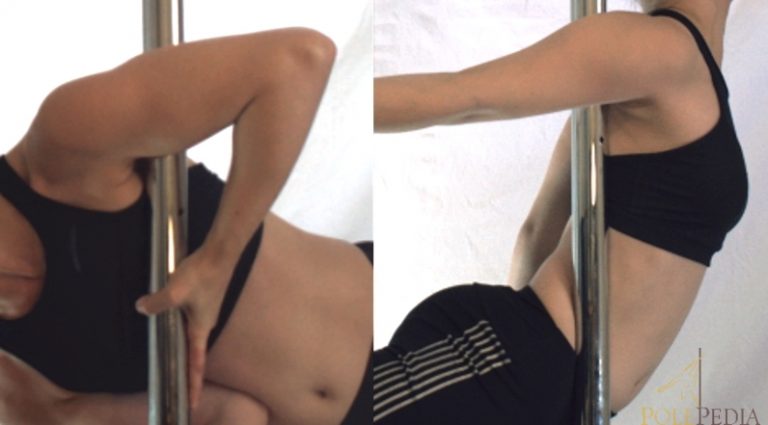
This hold is commonly used for moves such as:
- Tabletop (plank)
About the hold:
This grip isn’t very common, as it can be a little tricky to get into and not so comfortable depending on the length of your body. The tabletop plank is a great move for photoshoots, but not so much for routines where practicality rules. Now, that’s not to say you can’t go into other moves from a tabletop position; you absolutely can, so long as you have the strength to deadlift yourself there.
It is so very important to keep your shoulder blades (namely the scapula) and core engaged in this hold. This hold can be tough on the shoulders, requiring mobility to rotate while behind your back, and strength in the minor muscles to hold the position. Keeping your shoulders engaged will help relieve the stress on your shoulders, and keeping your core engaged will help ensure you don’t cave in and put additional stress on your shoulders or wrist.
How to get into it:
For a right-handed hold, your right arm should be on top.
For a left-handed hold, your left arm should be on top.
- Hold the pole with your dominant hand, bending the arm to bring the pole into your bicep.
- Squeeze the pole between your bicep and chest.
- With the opposite hand, reach behind your body and grab the pole, fingers facing away from you.
- Keeping the shoulders and core engaged.

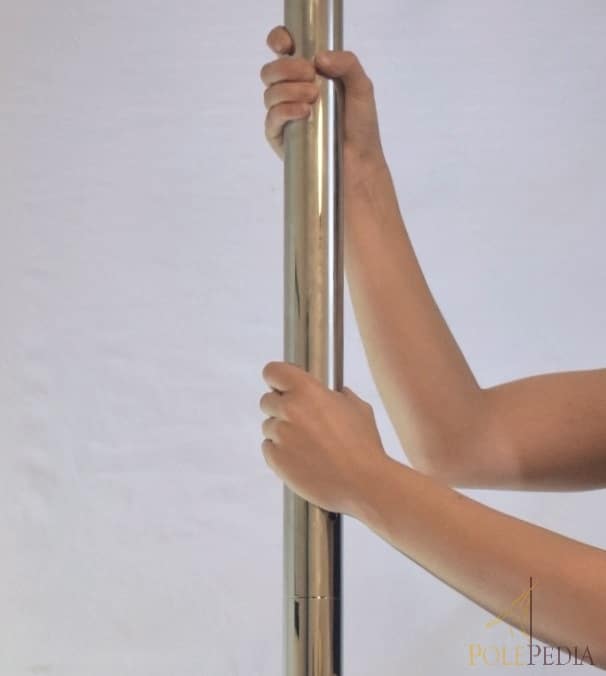
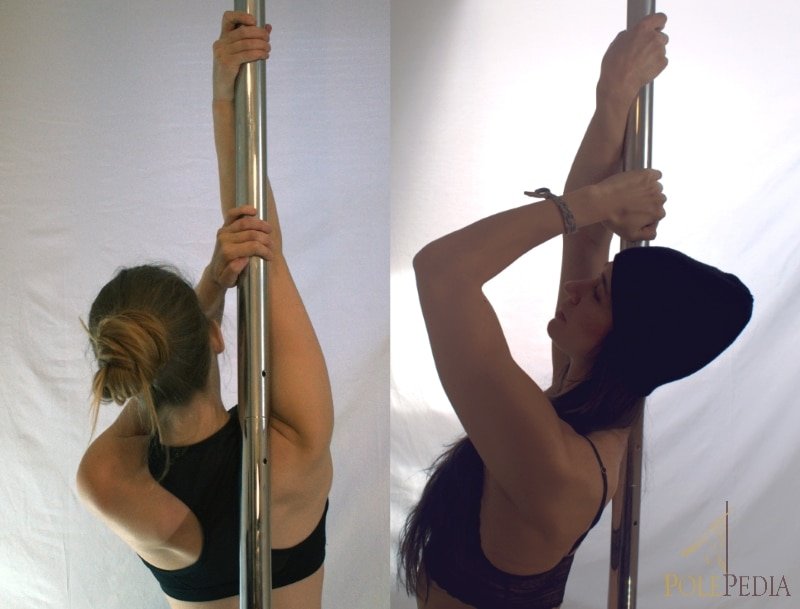
This hold is commonly used for moves such as:
- Twisted grip handspring (Inverted)
- Pencil (Inverted)
About the hold:
The twisted grip is a common variation of split grip. Instead of the top hand facing away from you like it might in split grip, your shoulder is rotated so you can reach around the pole and grabbing the opposite side. It sounds a little complicated when explained, but in practice it’s very easy to get into.
This is one of the most common hand grips for the handspring, probably only competing with cup grip. Twisted grip has a bit of controversy and debate surrounding it. To some people, it’s an injury waiting to happen, and to others, they couldn’t love it more.
How to get into it:
For a right-handed hold, your right hand should be on top.
For a left-handed hold, your left hand should be on top.
- With your dominant hand, reach high above your head and past the pole. Rotate your arm to grab the pole in a crush grip. Your hand should be facing towards your body.
- With your opposite hand, reach below and wrap your fingers around, pointing your index finger down, much like in split grip.
- Use the push-pull method.
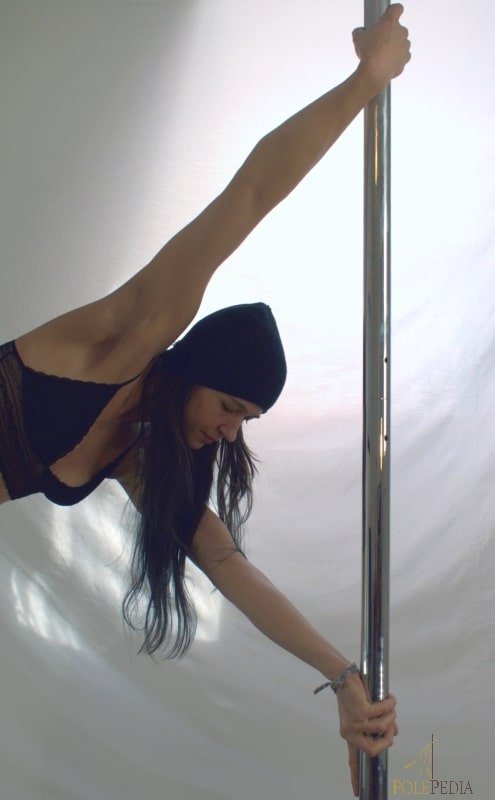
This hold is commonly used for moves such as:
- Shoulder mount (Inverted)
- Chopper invert (Inverted)
About the hold:
This grip is called Goofy grip by some for a reason. It looks uncomfortable and a little, well, goofy. In truth, this is an easy way to invert, whether you’re looking for a shoulder mount variation or a way to spice up your Chopper invert.
Especially in competitions, you can usually tell which invert someone is prepped for by the way they grip the pole; cup grip for shoulder mounts and stronghold for chopper inverts. While the Goofy grip is a little more challenging than these standard grips, it’s a great way to surprise the audience when you pop up unexpectedly into an invert.
How to get into it:
For a right-handed hold, your right arm should be bent on bottom.
For a left-handed hold, your left arm should be bent on bottom.
- Using your dominant hand, press the outside side of your elbow to the pole, at about chest height.
- Wrap your dominant arm around the front of the pole and grab the pole in a crush grip.
- Your fingers should be to the front of the pole, and your thumb to the back, facing you.
- Reach up high above your head with your opposite hand and grab the pole in a cup grip.
Torso Grips
This hold is commonly used for moves such as:
- Yogini
- Chopper Invert (Inverted)
- Hercules (Inverted)
About the hold:
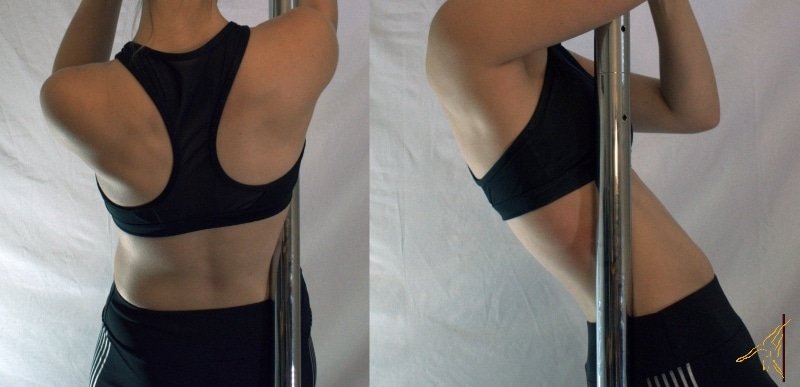
Though this grip is not so much a grip as it is a byproduct of an invert or hip hold, it’s still worthy to mention. Here, the pole will rest in the small of your waist as you lean back into your Chopper invert or hold your Yogini. This soft spot is right above your hip bones, and helps your body move with less resistance against the pole.
Men may find this spot trickier to find, as the “small of the waist” is less defined. In other words, it is the fleshy space underneath your ribs and above your hips.
How to get into it:
For a right-sided hold, the pole should be on the right side of your body.
For a left-sided hold, the pole should be on the left side of your body.
- Find the space between your hip bone and your ribcage. For women, this is typically where the small of their waist is.
- Rotate forwards (or backwards, depending on the move) until the pole fits into that space across your waist.
This hold is commonly used for moves such as:
- Pike (Inverted)
- Jade (Inverted)
- Hercules (Inverted)
About the hold:
The hip hold is a subtle but crucial hold; we’ll use Jade as an example here. If you’re just learning the move, chances are, you’re having trouble holding the move without sliding down the pole because you’re not including your hips into it.
If you’re in the right position, you can engage the hips by arching your back; this will cause your hips to come forward with the spine as it bends, pressing your hips into the pole. In Jade specifically, you can also bring your outside hand to your bum and help your hips forward.
How to get into it:
For a right-sided hold, the pole should be on the right side of your body.
For a left-sided hold, the pole should be on the left side of your body.
- With the pole on your dominant side, arch your back to squeeze the pole tightly.
Leg and Foot Grips
This hold is commonly used for moves such as:
- Apprentice
- Cupid
- Scorpio (Inverted)
- Gemini (Inverted)
- Cocoon (Inverted)
- Dangerous Bird / Suicide Spin (Inverted)
About the hold:
The knee pit is one of the most common places to grip the pole whether you’re working with beginner-level, intermediate, or advanced pole tricks. The first few tricks you do with this grip may be uncomfortable, but its versatility is incredible. Before you know it, the knee pit grip will be your best friend in the world of body holds.
How to get into it:
For a right-sided hold, use your right knee.
For a left-sided hold, use your left knee.
- Extend the leg with the soft, meaty part of the knee against the pole.
- This should be the back of the knee cap, right where your leg bends.
- Bend the leg, gripping the pole in your knee pit at a slight downward angle.
- Point your toes to help keep the leg engaged.
This hold is commonly used for moves such as:
- Cross Knee Ladysit
- Cross Knee Layback (Inverted)
About the hold:
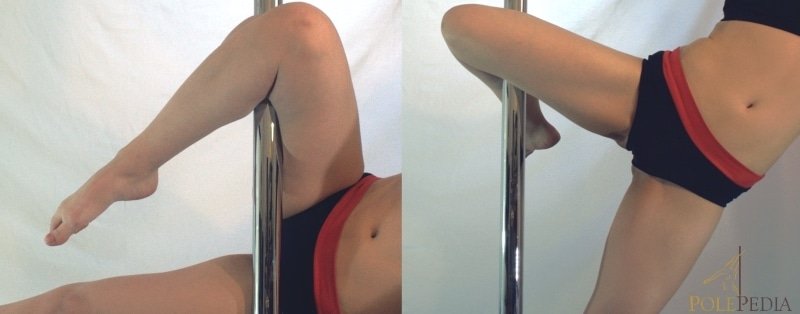
Have you ever taken a yoga class? Do you remember that “figure four” pose that had you standing on one leg, while the other leg was crossed on top of your knee, creating a space between your thighs? That’s exactly what this grip is.
Laybacks are some of the scarier beginner moves to accomplish, so it’s important to understand the grips that come with the territory. After you’ve gotten into your lady sit, you can cross your leg as shown and layback, using your bum to help your body rotate while your shin and calf keep you on the pole without slipping.
How to get into it:
For a right-sided hold, your right leg should be bent on top.
For a left-sided hold, your left leg should be bent on top.
- From a ladysit (upright thigh grip) extend your legs.
- Cross your dominant leg over the other, resting it on top of your thigh, slightly above the knee.
- This should result in a “4” shape; an upside-down “4” from your perspective.
- Keep the pole squeezed between your thighs, leaving only a gap close to the knees.
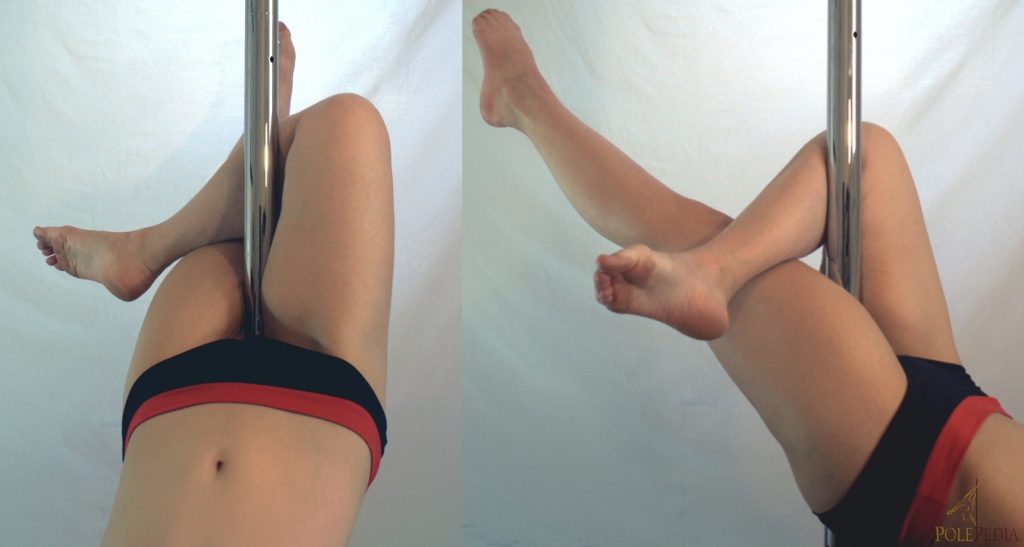
This hold is commonly used for moves such as:
- Superman
- Cross Ankle Layback (Inverted)
- Ladysit
About the hold:
The thigh grip is one of the most dreaded holds in the pole dance world. On the “not so bad” end of the scale, you have your Cross Ankle Layback, which you can get into upright from a ladysit. Your ankles are locked and you’re upright for the beginning half, so it’s not so bad on your upper thighs, even though the pole is pressed tightly between them.
Superman, on the other hand, takes some getting used to. There are a variety of ways you can get to this move, but here, the skin is pulled and pinched in the opposite direction. Of course, the more you work with this hold, the less it hurts; that can be said about almost anything about pinched skin in pole dancing.
Once you master this hold, it’s a versatile way to achieve more advanced moves that you might not have been able to before.
How to get into it:
- Situate the pole between your upper thighs.
- Tightly squeeze the pole between your legs.
- For added security, point your toes.
- In upright positions, you can easily layer one foot over the other and shift all your weight to one side or the other.
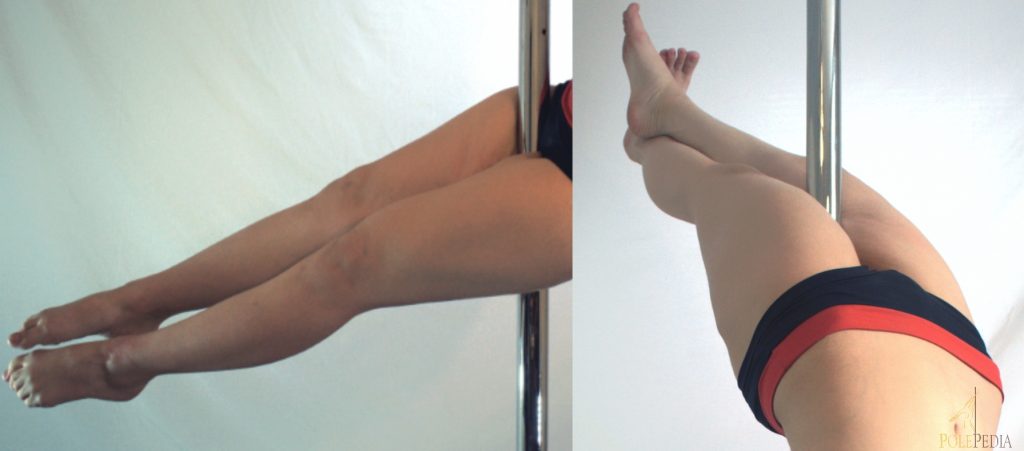
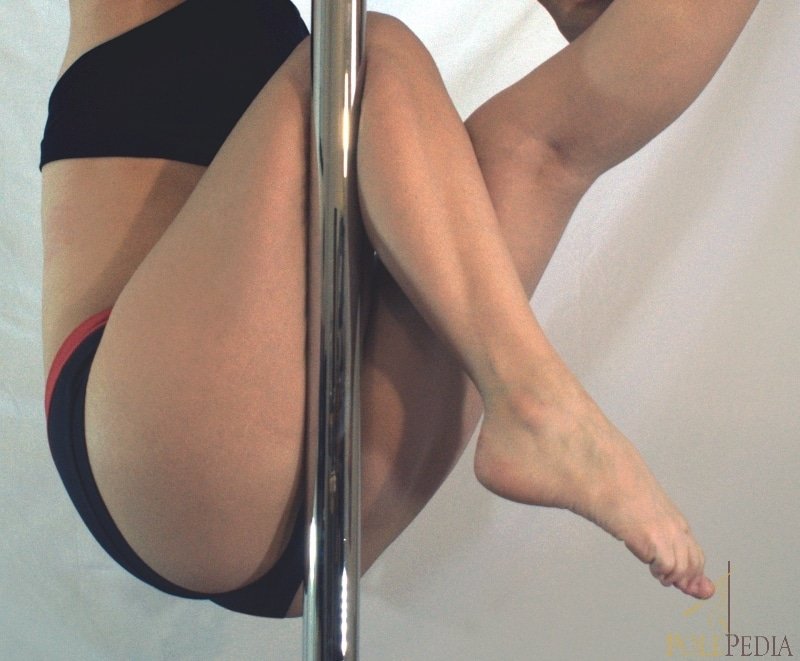
This hold is commonly used for moves such as:
- Sidesaddle Superman
- Russian Layback (Inverted)
- Martini Sit
About the hold:
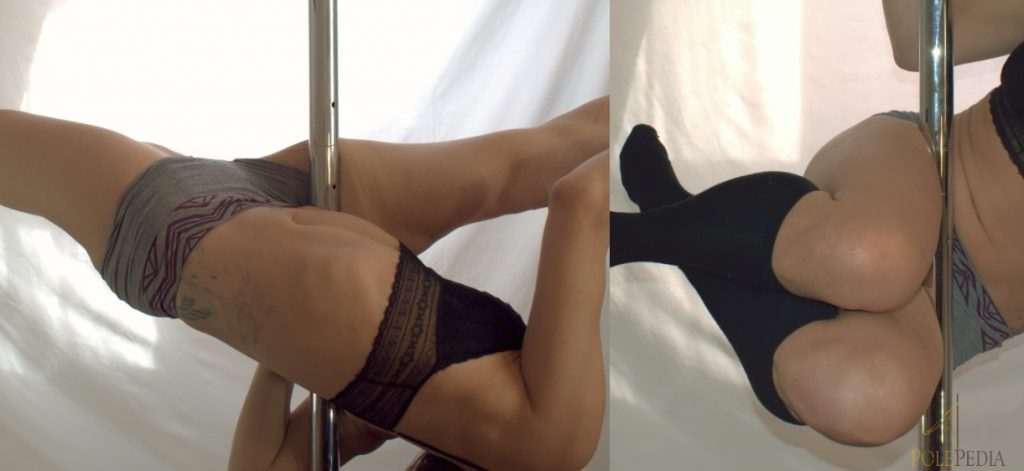
This hold is used in a variety of moves where the bum is resting on the pole and the leg is hooked on the side of the pole. You should feel secure in this hold with the pole against the length of your thigh and bum.
Common moves this hold is used with is the Sidesaddle Superman, the Russian Layback, and the Martini sit. These moves all use the same position for the inside leg to help secure your body, even if the outside leg and body positions are different.
How to get into it:
For a right-sided hold, your right leg should be bent.
For a left-sided hold, your left leg should be bent.
- With your dominant leg in a knee-pit grip, rotate into the pole so it rests along the inside of your leg and against your bum.